Yes, you can turn an armoire into a bird cage, and done right it makes a genuinely spacious, attractive enclosure that puts most commercial cages to shame. The catch is that a few specific decisions, wire type, bar spacing, finish safety, and ventilation, can make the difference between a safe home and a hazardous one. This guide walks you through every step: picking the right armoire, stripping and modifying it safely, planning the interior, and doing a final check before your bird moves in.
How to Turn an Armoire Into a Bird Cage Safely

Maya Bennett
22 Mar 2026
Choosing and Assessing Your Armoire
Not every armoire is a good candidate. Before you buy one at an estate sale or pull one out of storage, run through these four checks.
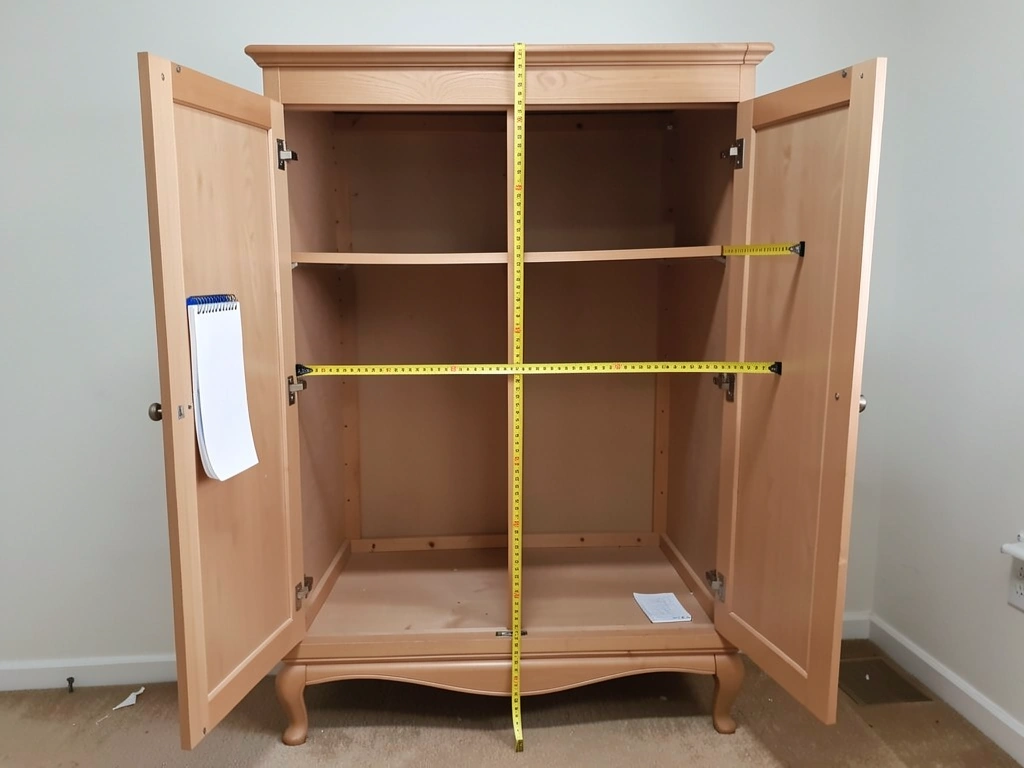
Size: does it actually meet minimum requirements?
For small birds like budgies, lovebirds, and parrotlets, the commonly cited minimum interior cage size is 20 x 20 x 30 inches (length x width x height). Cockatiels need at least 20 to 24 inches in both length and width. An armoire used as a bird enclosure is most valuable when it comfortably exceeds these numbers, so aim for an interior that is at least 30 inches wide, 20 inches deep, and 40 or more inches tall. Measure the interior after accounting for door frames and any fixed shelving you will remove. Do not count space lost to thick walls or decorative molding.
Materials and finish: the single biggest safety risk
This is where most DIY bird cage builds go wrong. Older armoires (pre-1980s especially) may be finished with lead paint, formaldehyde-based lacquers, or treated wood preservatives that off-gas when a bird is confined inside. Check for a strong chemical smell when you open the doors. If the interior smells like solvent, varnish, or old paint, plan to strip it completely before use. MDF and particleboard panels are also a problem because they release formaldehyde. Solid hardwood (oak, maple, poplar, birch) with a water-based, non-toxic, fully cured finish is ideal. If the armoire has a glossy factory lacquer and no smell, it may be fine, but you will still need to sand and seal any raw wood you expose during modifications.
Doors, latches, and structural stability
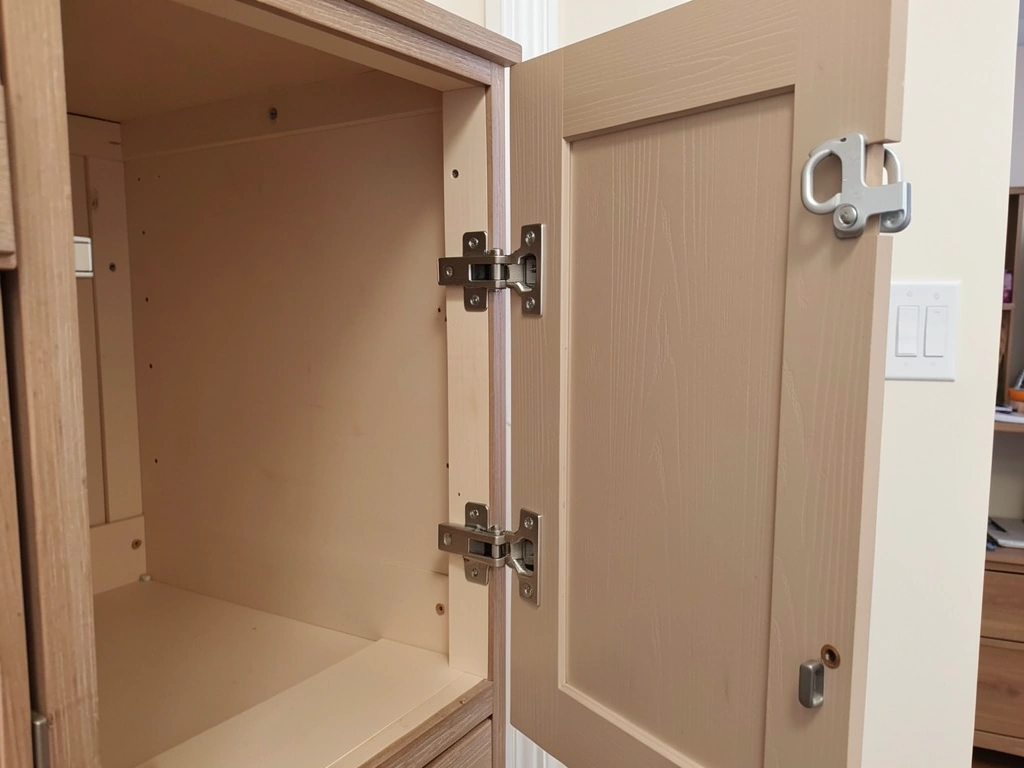
The armoire's existing doors will likely become the main access panels, so check their swing, hinges, and the quality of any existing latch. Parrots and even small birds are surprisingly good at working open simple magnetic or ball-catch latches. You will need to replace or supplement every latch with a carabiner clip or a two-step latch that requires opposing hand movements to open. Also rock the armoire gently from side to side: it should feel completely rigid. A wobbly cabinet that tilts is a tipping hazard if a large bird lands hard on a perch near the top. Add furniture anti-tip hardware to the wall as a standard precaution regardless.
Safety Essentials Before You Cut Anything
Wire type and bar spacing are non-negotiable safety specs. Get these wrong and birds can escape, get their heads stuck, or injure feet and beaks on sharp cut ends.
Bar spacing by bird size
The Merck Veterinary Manual lists 0.5 inches as the recommended bar spacing for budgerigars, cockatiels, lovebirds, and parrotlets. Cockatiel-specific sources narrow this to a range of 1/2 to 5/8 inch, with some allowing up to 3/4 inch for larger cockatiels. Staying at or below 1/2 inch (1.3 cm) is the safest single target for any of these species. Wider spacing risks head entrapment, which is fatal. If you are housing larger parrots like conures, African greys, or amazons, bar spacing of 3/4 to 1 inch is appropriate, but this guide is primarily focused on small to medium birds.
| Bird Type | Min. Cage Size (L x W x H) | Safe Bar Spacing |
|---|---|---|
| Budgerigar / Parrotlet | 20" x 20" x 30" | 1/2" (1.3 cm) |
| Lovebird | 20" x 20" x 30" | 1/2" (1.3 cm) |
| Cockatiel | 20–24" x 20–24" x 24–30" | 1/2" to 5/8" (1.3–1.6 cm) |
| Small Conure | 24" x 24" x 36" | 5/8" to 3/4" (1.6–1.9 cm) |
Wire type: what to use and what to avoid
Use welded wire mesh made from 16-gauge or heavier stainless steel. Stainless steel is the gold standard: it does not rust, it contains no zinc, and it is easy to clean. Galvanized wire (coated in zinc) is cheaper and widely available, but the zinc coating can cause heavy metal poisoning in birds that chew on it. If you use galvanized wire, it must be washed with a diluted white vinegar solution and thoroughly rinsed to remove loose zinc oxide from the surface before installation, then checked regularly for rust or peeling. Avoid hardware cloth coated in anything painted or plastisol-dipped, and never use chicken wire: the hexagonal weave is too flexible, the openings are irregular, and cut ends are brutally sharp.
Eliminating sharp edges
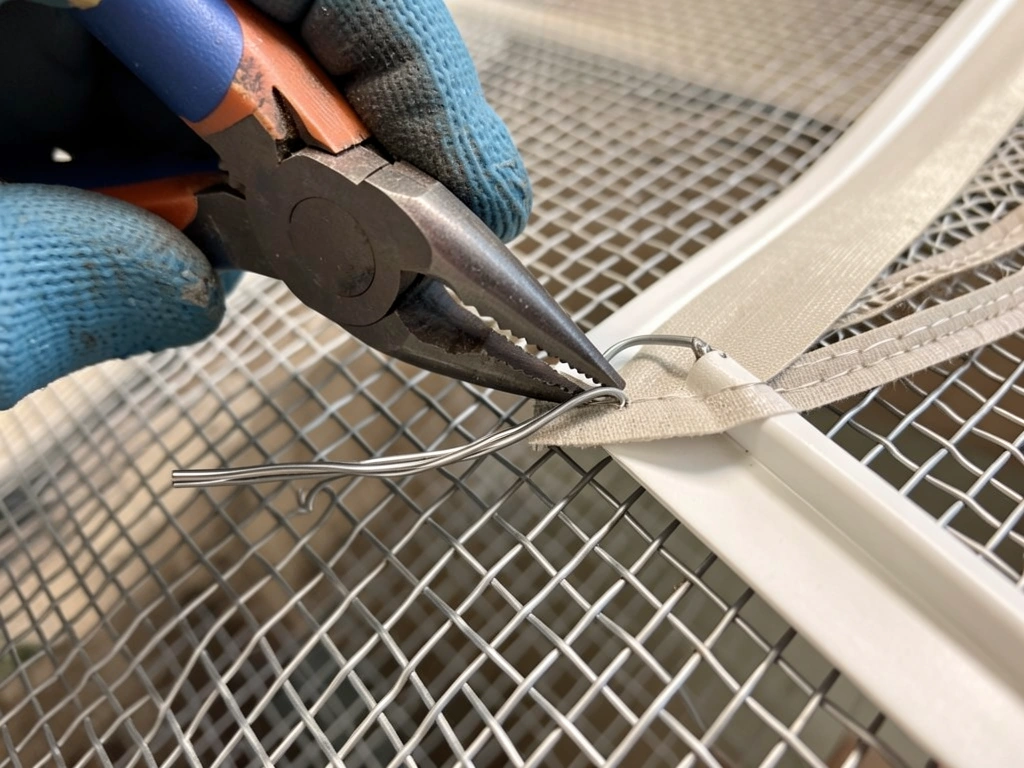
Every cut edge of wire mesh must be bent back 180 degrees with pliers or covered with a J-channel or edge trim. Run your bare hand across every edge before the bird goes in. If it snags your skin, it will cut a foot or face. Use a metal file on any stubborn points. For the wood frame cuts, sand every exposed edge to at least 120 grit and round the corners.
Planning the Interior Layout
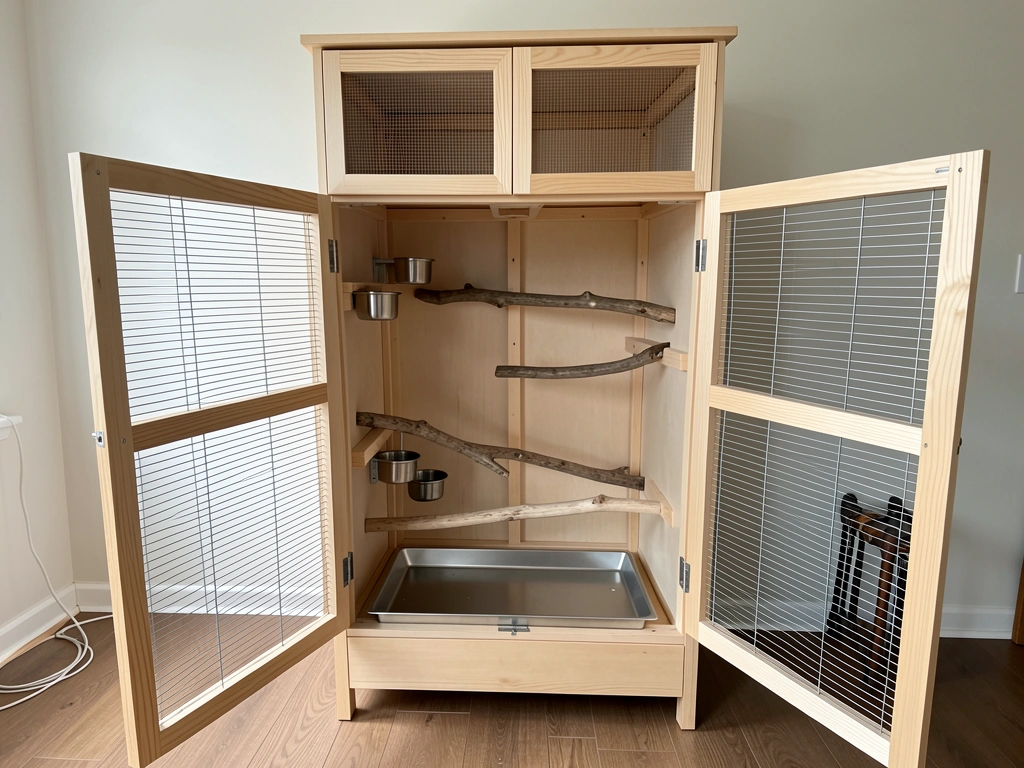
Think of the interior in three zones: the upper active zone (perches, toys, foraging space), the mid zone (feeding and watering stations), and the lower zone (floor, tray, and any nesting area if applicable).
Perches
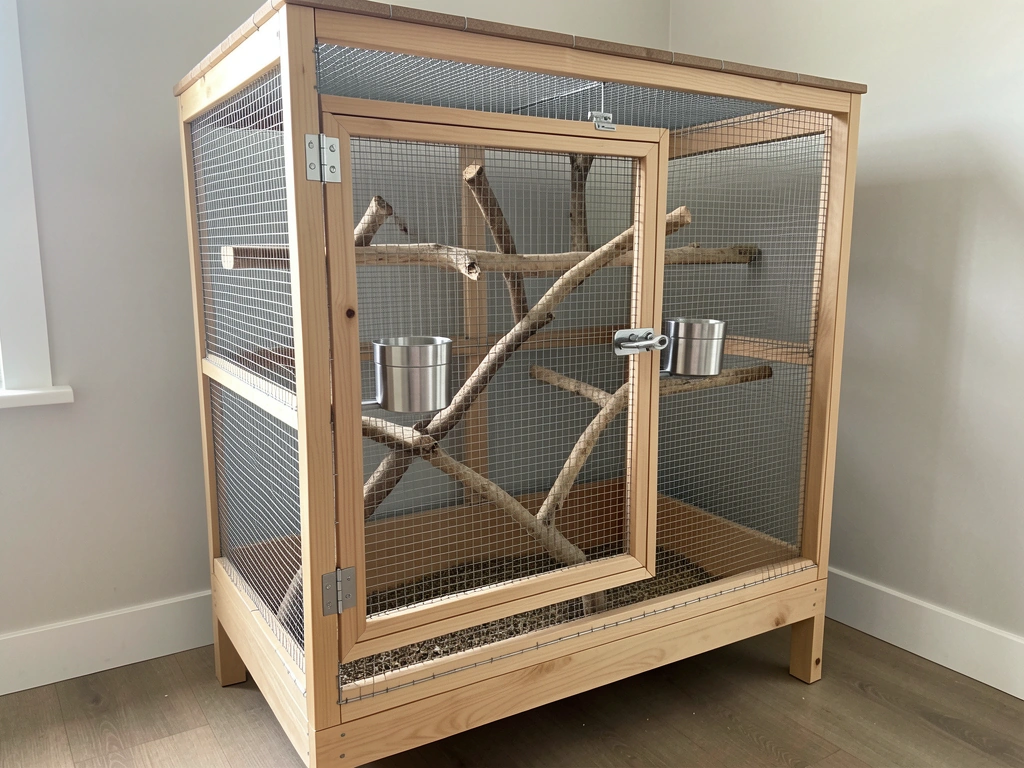
Install at least two perches at different heights, made from natural hardwood branches (apple, willow, manzanita, and birch are all safe). Vary the diameter so the bird's foot does not grip the exact same position constantly. Perches should be positioned so the bird can sit upright without its tail touching the wall or floor. Avoid placing perches directly above feeding stations or other perches, since droppings will contaminate everything below.
Feeders and water
Mount food cups on the side walls at mid-height, reachable from a perch without the bird walking on the floor. Stainless steel cups are easiest to disinfect. For water, a hanging bottle with a sipper tube stays cleaner than an open dish in an enclosed cabinet space, but many birds (especially cockatiels) strongly prefer an open dish: offer both and see what your bird uses. Leave enough clearance around each station for the cups to be lifted out without disassembling anything.
Nesting and egg-laying considerations
If you are keeping breeding pairs or a bird prone to egg-laying, designate a lower corner or a separate attached nest box outside the main enclosure footprint. Do not put nesting material loose on the floor: it creates a sanitation problem quickly. For most pet birds kept singly or in pairs without breeding intent, skip the nest box entirely.
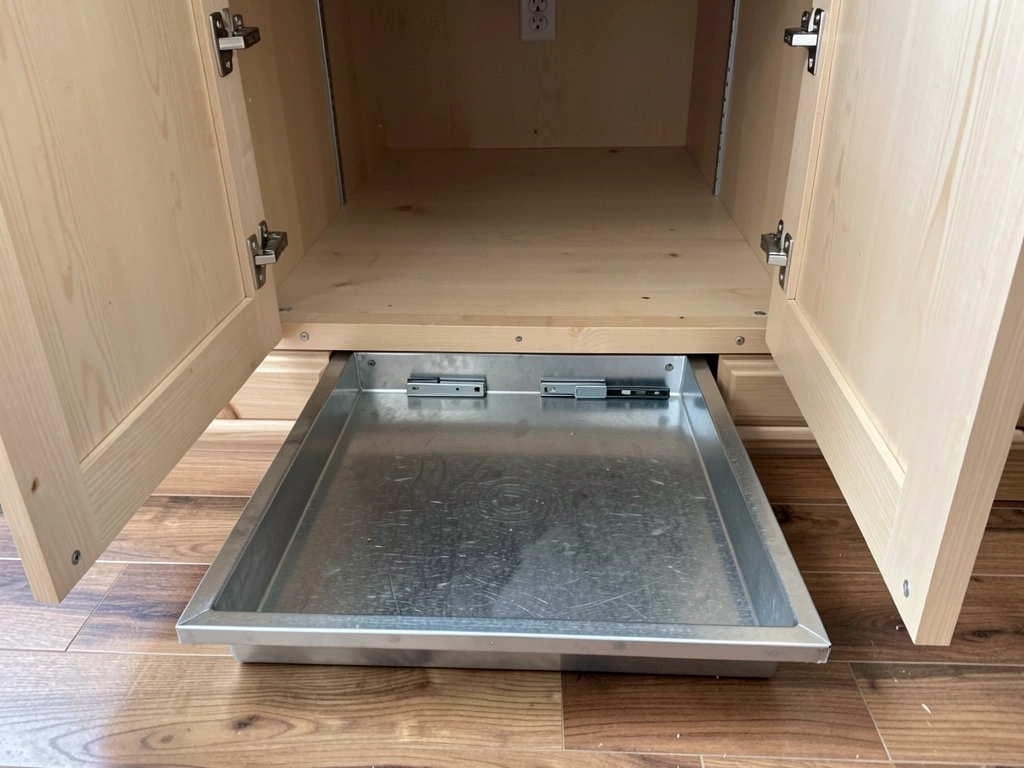
Floor and tray design
The floor is the hardest part of an armoire conversion to get right. You need a removable tray for daily cleaning. A sheet of galvanized or stainless steel cut to fit the interior floor, with a 1 to 2 inch lip on all sides to contain droppings and seed hulls, works well. Line it with cage paper or unprinted newsprint cut to size. Some builders add a wire grate above the tray (with 1/2-inch square openings) to keep the bird off its own droppings. If you plan to make a pull-out tray, cut a slot in the front lower panel and install drawer slides rated for the weight. For more on building a dedicated tray system, a guide focused on how to make a bird cage tray covers the fabrication in detail.
Converting the Armoire Step by Step
- Remove all interior shelves, rods, and hardware. Pull every screw and fill the holes with untreated hardwood plugs or a non-toxic wood filler, then sand smooth.
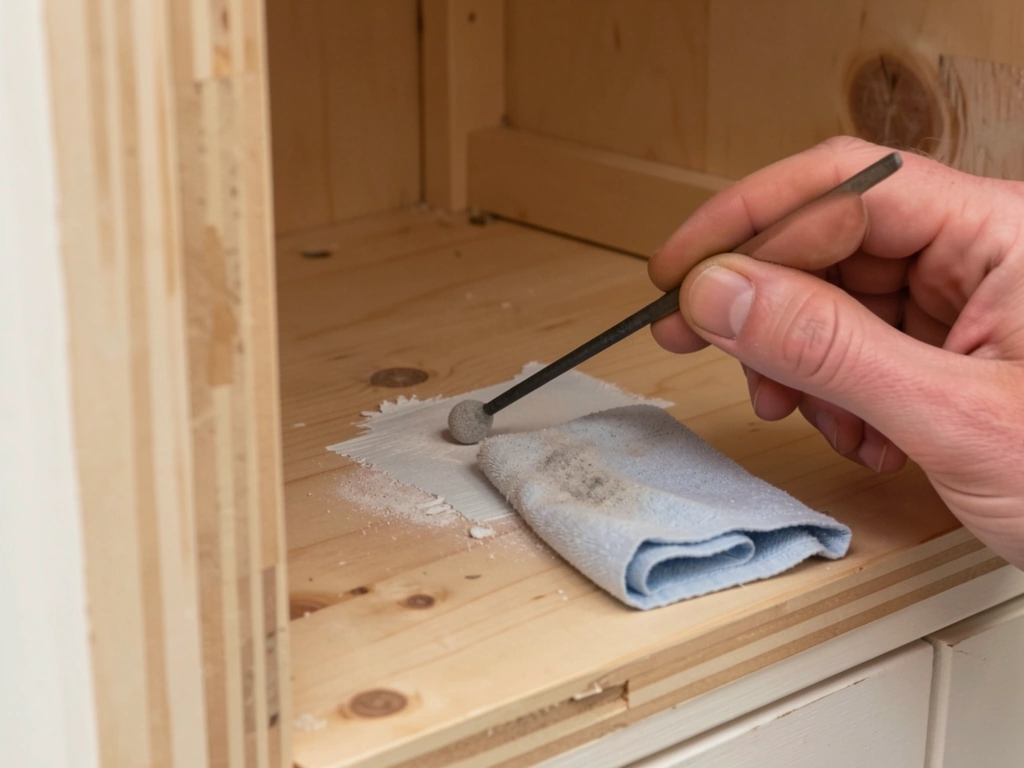
- Strip or encapsulate any suspect finish on the interior. If the paint tests positive for lead (use a $10 lead test swab from a hardware store) or smells strongly of solvent, sand it down to bare wood and apply two coats of a water-based, bird-safe sealant. Let it cure for at least 72 hours with the doors open before proceeding.
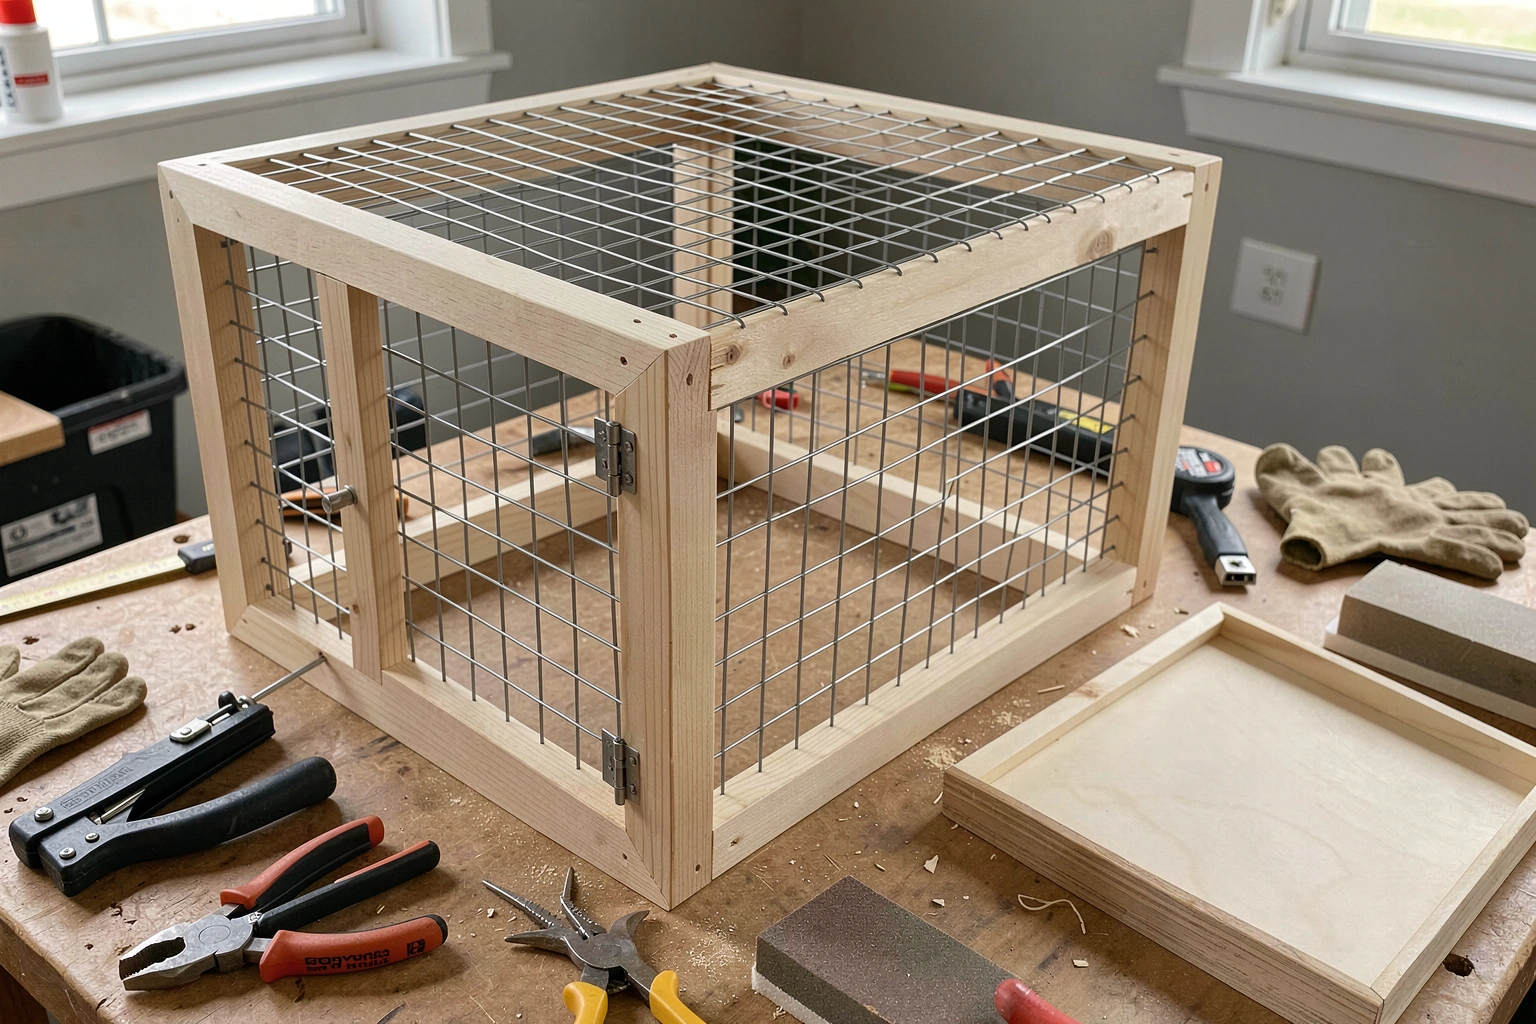
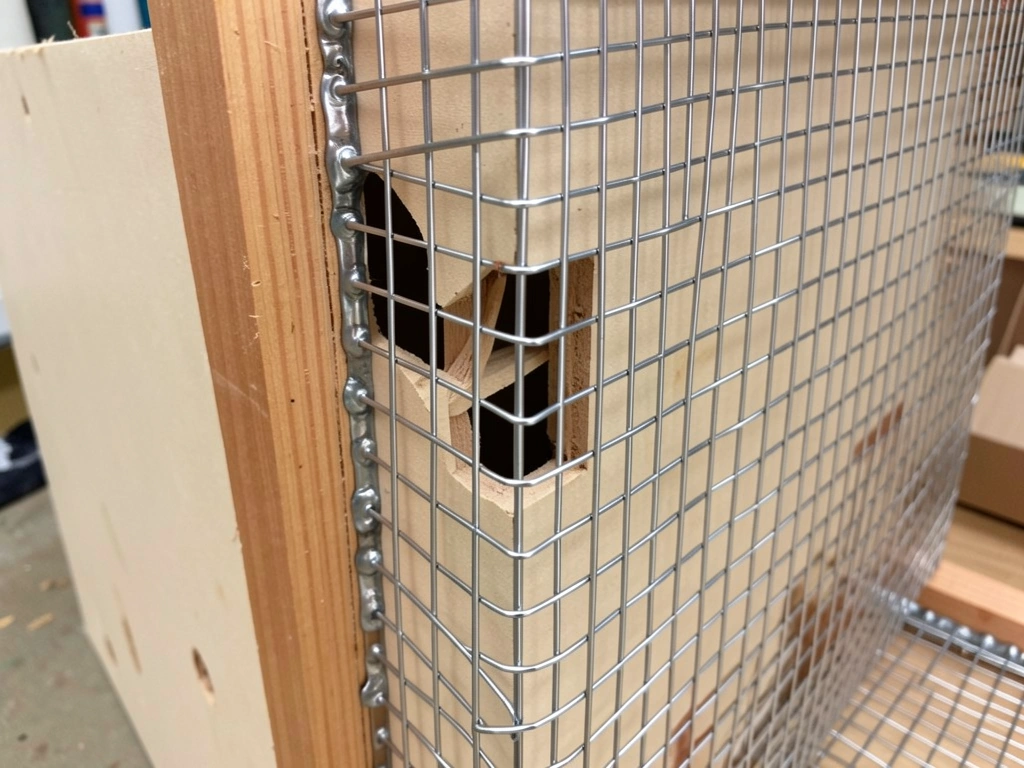
- Mark the panels you will replace with wire mesh. Typically this means the two side panels and possibly a back panel section. Leave at least a 2-inch solid wood border around each opening for fastening the mesh.
- Cut the panel openings with a jigsaw. Clamp the panel firmly before cutting and work slowly at corners. Smooth all edges with sandpaper.
- Cut wire mesh to size with aviation snips (tin snips work but aviation snips are easier on your hands). Cut slightly oversized so you have an inch of overlap onto the wood border.
- Staple the mesh to the wood frame with 1/2-inch heavy-duty staples every 2 inches around the perimeter. Then add a thin strip of hardwood or plywood (a lath) over the mesh edge and screw it down. This sandwiches the mesh and eliminates exposed cut edges entirely.
- Reinforce the mesh-to-frame junction on the interior side with a bead of bird-safe silicone sealant along the wood-to-mesh seam. This prevents gaps where a small bird could squeeze a toe or beak.
- Install the pull-out tray at floor level. If adding drawer slides, mount them on both interior side walls at the same height, test the tray slides smoothly, and confirm there is no gap between the tray edges and the side walls large enough for a bird to fall through.
- Replace all door latches with two-step carabiner-style clips or baby-proof cabinet locks. Test each latch from the inside by pushing firmly.
- Do a final edge check: glove off, run your bare hand over every wire edge, every wood edge, and every hardware piece inside the enclosure.
Ventilation, Airflow, and Light
An armoire is essentially a box, and enclosed boxes trap stale air, humidity, and ammonia from droppings fast. Ventilation is not optional. The goal is passive airflow that moves air through the cage without creating a cold draft directed at the bird, because drafts are a real welfare and health risk for birds.
Creating airflow paths
The wire mesh panels you install on the sides are your primary ventilation. For a solid-back armoire, also replace a section of the back panel (upper third) with mesh, or drill a row of 1-inch holes across the top of the back panel and cover them with mesh from the inside. This creates a low-to-high airflow path: fresh air enters through the lower side panels and exits through the upper back. Avoid placing the only ventilation openings directly across from each other at the same height: this creates a horizontal draft that blows straight through the bird's roosting zone.
Placement in the room
Position the armoire away from exterior doors, air conditioning vents, and cooking areas. The kitchen is a particularly dangerous spot for any bird enclosure because non-stick cookware fumes (PTFE, released when overheated) are lethal to birds even at low concentrations. A living room or bedroom wall away from windows that get afternoon sun is usually best. The cage should receive some indirect natural light each day but should not bake in direct sun, which can overheat an enclosed cabinet quickly.
Night covering
Because the armoire has solid door panels, closing the doors at night serves the same purpose as draping a cover over a wire cage: it signals darkness and reduces stimulation. If your bird panics when the doors are closed (a behavior some birds show when light is cut off suddenly), leave the doors slightly ajar or use a thin breathable cloth over just the mesh panels instead. The key is not complete darkness but a consistent low-light, low-noise sleep environment of about 10 to 12 hours.
Cleaning and Maintenance Workflow
An armoire cage is easier to clean than most commercial cages once you have the tray system sorted, because you can actually stand up inside to reach the corners. But the enclosed nature also means smells and bacteria build up faster if you skip days.
Daily tasks
- Pull out the floor tray, remove the liner, and replace it with fresh cage paper or unprinted newsprint.
- Wash food cups with hot soapy water and rinse thoroughly before refilling.
- Change water completely: do not just top it up.
- Wipe down any perch or toy with visible droppings using a damp cloth.
Weekly tasks
- Remove perches and scrub them with a diluted white vinegar solution (1 part vinegar to 3 parts water), rinse, and dry before returning.
- Wipe down all interior wood surfaces and the wire mesh with a bird-safe disinfectant or diluted vinegar solution.
- Scrub the floor tray itself, not just the liner.
- Inspect the wire mesh for any bent sections, loose staples, or rust spots and address them immediately.
Monthly deep clean
Once a month, move the bird to a temporary enclosure and do a full interior clean: all perches out, all cups out, wipe every surface including the ceiling, and let everything dry fully before the bird goes back in. This is also when you check hinges, latch hardware, and the wall anti-tip anchor for security.
Tools, Materials, and Mistakes to Avoid
What you will need
| Item | Spec / Notes |
|---|---|
| Welded wire mesh | 16-gauge stainless steel preferred; galvanized acceptable if vinegar-washed and dried |
| Aviation snips | For cutting mesh cleanly; tin snips work as a backup |
| Heavy-duty staple gun | 1/2" staples; electric or pneumatic is easier than manual for mesh work |
| Wood lath or plywood strip | 1/4" x 3/4" to cap mesh edges; hardwood preferred |
| Jigsaw with fine-tooth blade | For cutting panel openings; clamp panel before cutting |
| Lead test swabs | To check existing paint before sanding |
| Water-based bird-safe sealant | For sealing raw wood edges inside the enclosure |
| Bird-safe silicone sealant | For sealing mesh-to-wood seams |
| Two-step carabiner latches | One per door; replace all existing magnetic or ball-catch hardware |
| Furniture anti-tip strap | Anchor the finished cage to the wall |
| Pull-out tray (custom cut) | Galvanized or stainless steel with 1–2" lip |
| Drawer slides | Rated for tray weight; heavy-duty 100 lb slides are reliable |
| Natural wood perches | Apple, willow, manzanita, or birch; 2+ at varying diameters |
| Stainless steel food/water cups | Dishwasher-safe; mount at mid-height on side walls |
Common mistakes that will cost you
- Using galvanized mesh without treating it first: zinc toxicity is real and cumulative in birds.
- Skipping bar spacing measurement: eyeballing 1/2 inch is not accurate enough. Use a ruler or a bar spacing gauge every time.
- Leaving the back panel solid: a solid back with mesh only on the sides creates poor airflow and ammonia buildup.
- Using MDF or particleboard for interior repairs: these off-gas formaldehyde. Use solid wood only for any patching or added framing.
- Installing perches directly above food cups: droppings in the food lead to bacterial infections fast.
- No pull-out tray: if cleaning the floor requires removing the bird and dismantling the enclosure, you will skip it, and the cage will become unsanitary.
- Trusting the armoire's existing latches: decorative furniture hardware is not designed to resist a determined parrot. Replace every single one.
- Putting the enclosure in or near the kitchen: PTFE fumes from overheated non-stick pans can kill a bird within minutes.
Final Safety Check Before Your Bird Moves In
Before introducing any bird, go through this checklist. If any item is a 'no', fix it before proceeding.
- Interior dimensions meet or exceed the minimum for your species (see table above).
- All wire mesh is 16-gauge welded steel with spacing at or below 1/2 inch for small birds, confirmed with a ruler.
- Every cut wire edge is bent back or covered with lath. No snag points on a bare-hand check.
- Interior wood is bare hardwood or fully cured water-based sealant. No lead paint, no solvent smell, no MDF.
- All original latches replaced with two-step bird-proof hardware.
- Armoire is anchored to the wall with anti-tip hardware.
- Pull-out floor tray fits snugly with no gaps larger than 1/4 inch at the sides.
- At least two ventilation paths exist (mesh panels plus upper back ventilation) and no direct cross-draft hits the main perch zone.
- No perches positioned above food or water stations.
- Cage is positioned away from the kitchen, exterior doors, and HVAC vents.
- All new wood perches and hardware are free of chemical smell after 24 hours inside the closed enclosure.
- A temporary backup enclosure is available for cleaning days.
If you have already built a smaller or simpler DIY enclosure before, this build is a natural step up. The armoire format is especially well-suited to birds that benefit from large, enriched spaces, which is most of them. Get the wire spec and finish safety right, build in that pull-out tray from day one, and you will have an enclosure that is genuinely more functional and more comfortable than most store-bought options at twice the price.
FAQ
How long should I ventilate the armoire after stripping and sealing before bringing my bird inside?
After stripping and sealing, let the armoire air out in a well-ventilated area for at least 72 hours, then do a “no odor” check with the doors open and again after closing them for 1 hour. If you still detect solvent, varnish, or “new paint” smells, strip again or re-seal with a fully cured, water-based, bird-safe finish and wait longer. Birds are far more sensitive to fumes than people.
Is it safe to use my armoire if I’m not sure about its age or previous treatments?
If you cannot confirm the armoire’s age and finish, treat it as unsafe. Pre-1980 pieces can contain lead-based paint or formaldehyde-based finishes, and “looks okay” is not a reliable indicator. The safest approach is complete stripping of all interior coatings, replacing any MDF or particleboard panels, then sanding exposed areas and sealing with a non-toxic, fully cured water-based finish.
Can I use the armoire shelves as part of the bird’s habitat?
Only if you remove or re-cover them in a bird-safe way. Shelves often become perching and droppings catch zones, and raw wood edges can be hazardous. If you keep them, cover all surfaces with an easily cleanable, non-porous lining (and ensure sharp edges are trimmed), or remove them to create a cleaner floor tray and better airflow.
What should I do if my bird still tries to escape through the door gaps even after replacing the latch?
Door security needs both latch strength and physical gap control. Add a secondary closure (two-step design) and also address side-to-side and top-to-bottom gaps by installing a rigid mesh framework or keyed trim so there is no pathway larger than the safe bar spacing. Re-test by gently shaking the cabinet with the doors latched and watching for any movement that creates a gap.
How can I tell whether my ventilation holes are positioned correctly?
Aim for a low-to-high airflow pattern that does not create a direct blast at roost height. A practical test is to hold a thin tissue near the lower ventilation area and observe whether it moves upward without being blown straight across the bird’s primary roost. If you see airflow blowing across the roosting zone at bird face level, reposition holes or add a deflector plate inside the back mesh area.
What temperature and humidity issues should I watch for in an enclosed armoire cage?
Enclosed cabinets often trap heat and humidity unevenly. Monitor both before and after introducing the bird, especially in summer or near HVAC vents, and avoid placing the cage where it can overheat from direct sun. If you notice persistent dampness, condensation on the back or ceiling, or musty smells, increase ventilation surface area and improve airflow paths rather than relying on spot cleaning.
How do I prevent the wire tray or grate from injuring a bird’s feet?
Ensure the grate openings are large enough for droppings to fall but not so wide that toes can catch, and smooth the underside edges where wire meets the frame. If you use a pull-out tray with drawer slides, confirm the tray cannot tilt and that there are no pinch points when sliding it in and out. Always do a “foot safety” check by placing the bird on the grate area briefly to watch for stumbling or pressure points.
Can I use natural branch perches that have been outdoors, like from my yard?
Yes, but sanitize first. Remove bark if it flakes, scrub with a stiff brush, then soak or thoroughly clean and fully dry before installation. Avoid branches that smell like chemicals (treated wood, landscaping sprays) and do not use unknown species. After drying, ensure the perch is stable and cannot rotate or wobble when the bird grips it.
My bird is a chewer. What changes should I make for chewing risk around the wire and wood frame?
Chewing increases wear on mesh and wood edges, so overspec the hardware. Use heavier stainless welded wire, inspect weekly for loose staples or frame flex, and replace any panel that starts to pull away. Cover any wood edges with edge trim and keep perches placed so the bird is not repeatedly grinding directly at the door or cut-frame areas.
How should I transition my bird into the armoire cage to reduce stress?
Move the bird during a calm part of the day and keep the room quiet for the first 48 hours. Leave the doors open initially so the bird can explore without feeling trapped, then close them only after it shows normal settling behavior. If your bird panics with the doors shut, keep a partial cover or keep doors slightly ajar during the adjustment period, aiming for consistent, low-noise sleep later.