Yes, you can absolutely build a safe, durable, escape-proof bird cage yourself. The key is making the right decisions before you cut a single piece of wire: cage size, bar spacing, and materials are non-negotiable safety issues, not aesthetic ones. Get those right, and the actual build is very manageable with basic tools. This guide walks you through the full process, from planning your cage dimensions to setting it up in your home and keeping it clean.
Do It Yourself Bird Cage: Build a Safe Cage Step by Step

Maya Bennett
22 Mar 2026
Choose the Right Cage Type and Size for Your Bird
Start with a simple rule: cage width should be at least 1.5 times your bird's full wingspan. That baseline keeps the cage from feeling like a closet. Beyond that, the type of bird determines not just size but also the shape and style of cage that makes sense. A tall, narrow cage wastes vertical space that a parrot will never use comfortably. A wide, horizontal cage is much better for most parrots because they climb side to side more than they fly straight up.
Here are the minimum cage dimensions, pulled from veterinary reference standards. These are absolute minimums, not targets. Build bigger whenever your space and budget allow.
| Bird Type | Minimum Cage Size (L × W × H) | Max Bar Spacing |
|---|---|---|
| Budgerigar (budgie), cockatiel, lovebird, parrotlet | 20 × 20 × 30 inches | 0.5 inch |
| Conure, Poicephalus spp., caique, miniature macaw | 36 × 24 × 48 inches | 0.75 inch |
| Large macaw, large cockatoo | 40 × 30 × 60 inches or larger | 1.0–1.5 inches |
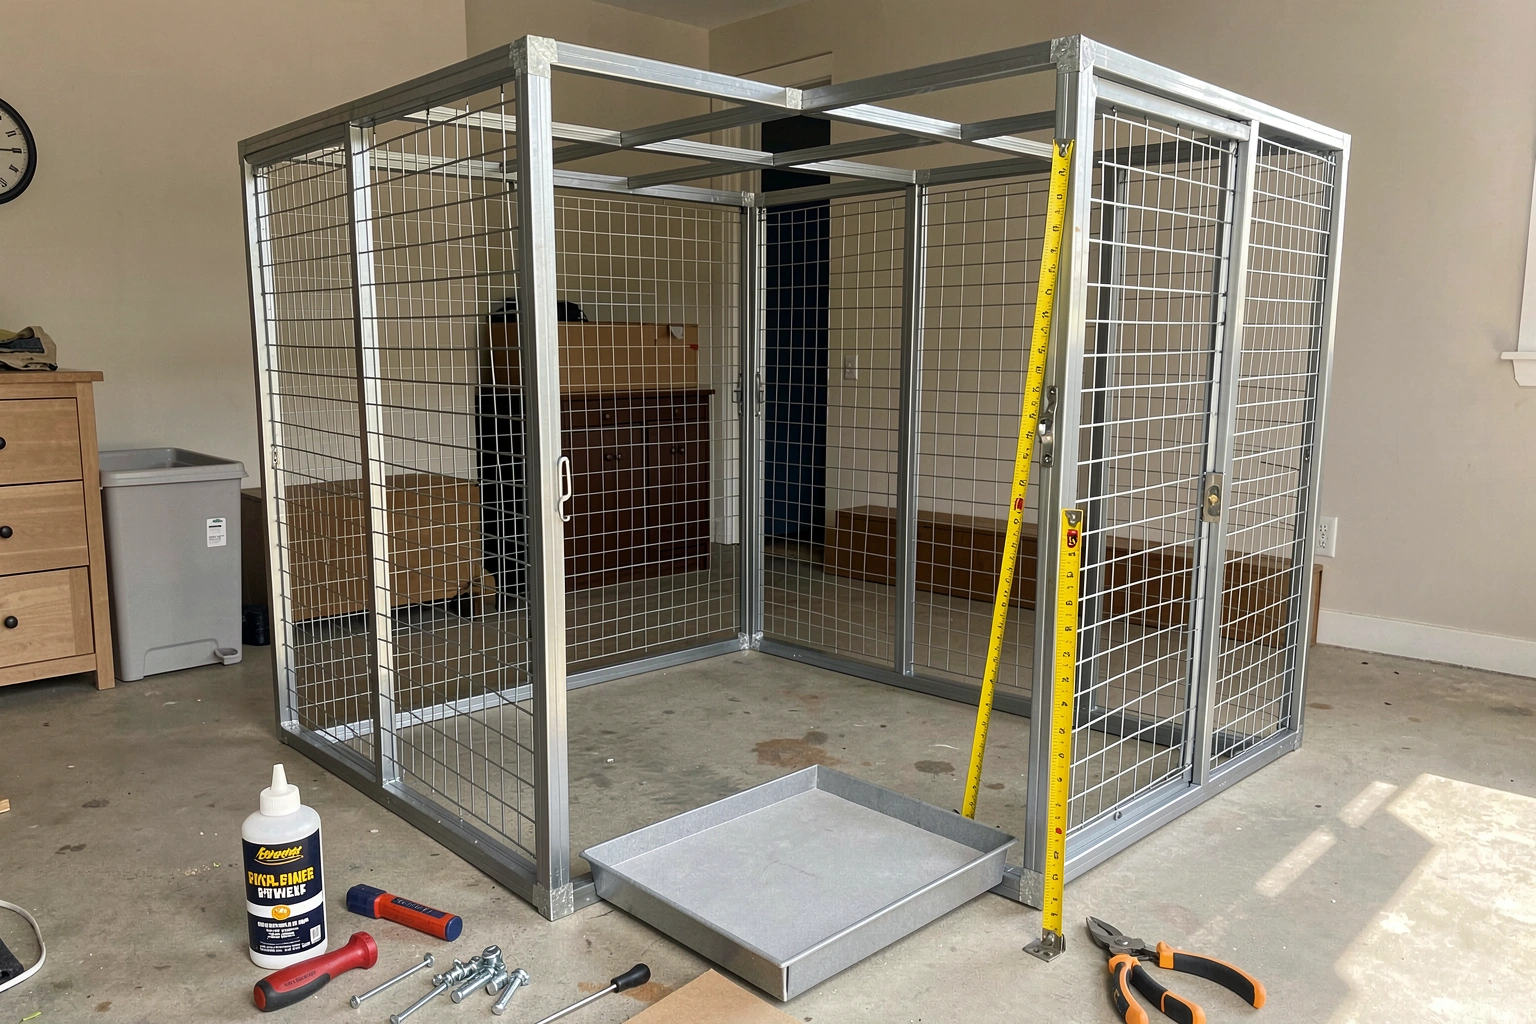
Cage style matters too. A box-frame cage with welded wire panels works well for most DIY builds and suits birds from budgies up through medium parrots. For larger birds like macaws, a heavier welded-wire aviary-style build with a separate entry vestibule (a double-door entry system that prevents escapes) is a much smarter setup. If you're building for multiple smaller birds, a walk-in aviary design is worth considering. Detailed guidance on large-format builds and cabinet conversions falls into its own territory, but the principles in this guide apply across all of them.
Safety Basics: Bar Spacing, Materials, and Toxic Coatings to Avoid
This section is the most important one in the article. Cage aesthetics don't matter if your bird gets its head stuck between bars or is slowly poisoned by a toxic coating. These are the three areas where DIY cages most commonly go wrong.
Bar Spacing
Incorrect bar spacing is a genuine life-safety issue. A parrot that can fit its head between bars but not pull it back out will panic, thrash, and can die. For budgies, lovebirds, parrotlets, and cockatiels, keep spacing at or below 0.5 inches. Madagascar lovebirds specifically need no more than 0.5 inches. For cockatiels and small conures, 0.5 to 0.625 inches is acceptable. Medium birds like conures, caiques, and Poicephalus parrots do well at 0.75 inches. Never guess on this measurement. Use a caliper or a marked ruler and verify every section of the finished cage before your bird goes in.
Wire Gauge and Material
Stainless steel is the gold standard for DIY bird cages. It is non-toxic, doesn't rust, and can't be chewed through by most parrots. The downside is cost. For a budget build, welded wire coated in a bird-safe powder coat is a solid alternative, but you must verify what the coating contains. Galvanized wire is where most DIY builds go wrong. New galvanized wire has a zinc coating that causes heavy metal toxicosis in birds, a serious and potentially fatal condition. If you use galvanized wire, it must be scrubbed thoroughly with a vinegar solution and allowed to weather for several weeks before a bird ever touches it, and even then many avian vets advise against it entirely. The safest position is to avoid galvanized wire altogether for any surface your bird can contact.
Coatings and Finishes to Avoid
Lead-based paint is an obvious no. Less obvious is the risk from nonstick (PTFE/Teflon) coatings. You won't be coating a cage with Teflon, but if you're building a cage near a kitchen or using power tools near cookware, it's worth knowing: overheated PTFE releases fumes that are lethal to birds, even in adjacent rooms through normal home air circulation. Keep that in mind for placement later. For the cage frame itself, avoid any paint or spray coating that lists zinc, lead, or chromate compounds in the ingredients. Food-safe epoxy paints, properly cured powder coats, and natural lacquers made for use around animals are all acceptable. If you're hiring someone to powder coat your frame, give them clean, oil-free, rust-free metal. Surface prep is everything for powder coat adhesion and durability.
Materials and Tools Checklist for a DIY Build
Here is what you need for a standard box-frame cage suitable for small to medium parrots. Scale up wire gauge and frame tubing for larger birds.
- Welded wire mesh (stainless steel preferred, 14–16 gauge for small birds, 12–14 gauge for medium birds) cut to your panel dimensions
- Square steel tubing or aluminum angle iron for the frame (1-inch square tubing works well for most builds)
- J-clips or hog rings plus J-clip pliers for connecting wire panels
- Zip ties (stainless steel) as a backup fastener for wire-to-frame connections
- A metal cutting saw or angle grinder with cutting disc for frame pieces
- Wire cutters and lineman's pliers
- Drill with metal drill bits (1/8 inch and 3/16 inch)
- Stainless steel bolts, nuts, and washers for frame assembly
- Measuring tape, square, and caliper
- Metal file or deburring tool to remove sharp edges after cutting
- Bird-safe paint or powder coat for the frame (optional but recommended)
- Slide-out tray material: stainless steel sheet or ABS plastic cut to size
- Heavy-duty door latch hardware (carabiner clips or parrot-proof cage locks)
- Perch materials: natural wood branches (manzanita, java wood) or untreated hardwood dowels
A welder is helpful for the frame but not required. Bolted or pop-riveted frames work fine for small to medium cages. If you do weld, use stainless steel wire and make sure welds are fully cooled and cleaned of any flux residue before the cage is used. Never use lead-based solder anywhere on a bird cage.
Step-by-Step Build: Frame, Bars, Doors, and Secure Connections
Step 1: Plan and Cut Your Frame
Draw your cage dimensions on paper first. Mark every panel: front, back, left side, right side, top, and bottom. Account for the slide-out tray (usually 1.5 to 2 inches of clearance at the bottom). Cut your square tubing or angle iron to length, deburr every cut end with a metal file, and dry-fit the pieces before drilling. Label each piece with masking tape to avoid confusion during assembly.
Step 2: Assemble the Frame
Bolt or weld the frame together, checking for square at each corner with your square tool. A frame that's out of square will cause the wire panels to bow and create gaps. If bolting, use two bolts per corner joint to prevent rotation. Once the frame is assembled, apply your finish coat if you're painting, and let it cure fully before attaching wire. If you're powder coating, this is the point to send the frame out.
Step 3: Cut and Attach the Wire Panels
Cut wire panels 0.5 to 1 inch larger than the opening on each side so they overlap onto the frame and give you attachment points. Use your wire cutters and leave no sharp points. After cutting, run your gloved hand across every edge and use a file to knock down any burr you feel. Sharp wire ends are a serious injury risk. Attach panels to the frame using J-clips every 2 to 3 inches around the perimeter. Pull each clip tight with your J-clip pliers until it locks flat against the wire. Loose clips can be worked open by determined birds. For extra security, add stainless zip ties at every corner.
Step 4: Build and Hang the Door
Cut a door opening in the front panel sized so you can comfortably reach in and remove your bird and any accessories. For small birds, a 5 × 5-inch opening is workable. For medium parrots, 8 × 10 inches or larger is more practical. Frame the door opening with a small piece of the same tubing you used for the main frame. Build the door itself from a small wire panel with its own frame. Hinge it with stainless steel hinge pins or commercial bird-cage hinges. The latch is critical: parrots, especially conures and larger species, are problem solvers. Use a carabiner clip or a parrot-proof latch that requires two simultaneous movements to open. Test it yourself with one hand, then the other. If a curious human can open it one-handed, a motivated parrot probably can too.
Step 5: Final Safety Check Before Use
Before your bird goes anywhere near the finished cage, do a full inspection. Run your bare hand over every interior surface. Feel for sharp wire ends, raised bolt heads, loose clips, or gaps where a toe or beak could get caught. Check every bar spacing with your caliper. Rattle the door to test the latch. Look for any paint or coating that didn't cure properly (tacky spots, bubbling). Wipe the entire interior with a damp cloth and let it dry. Then do it again.
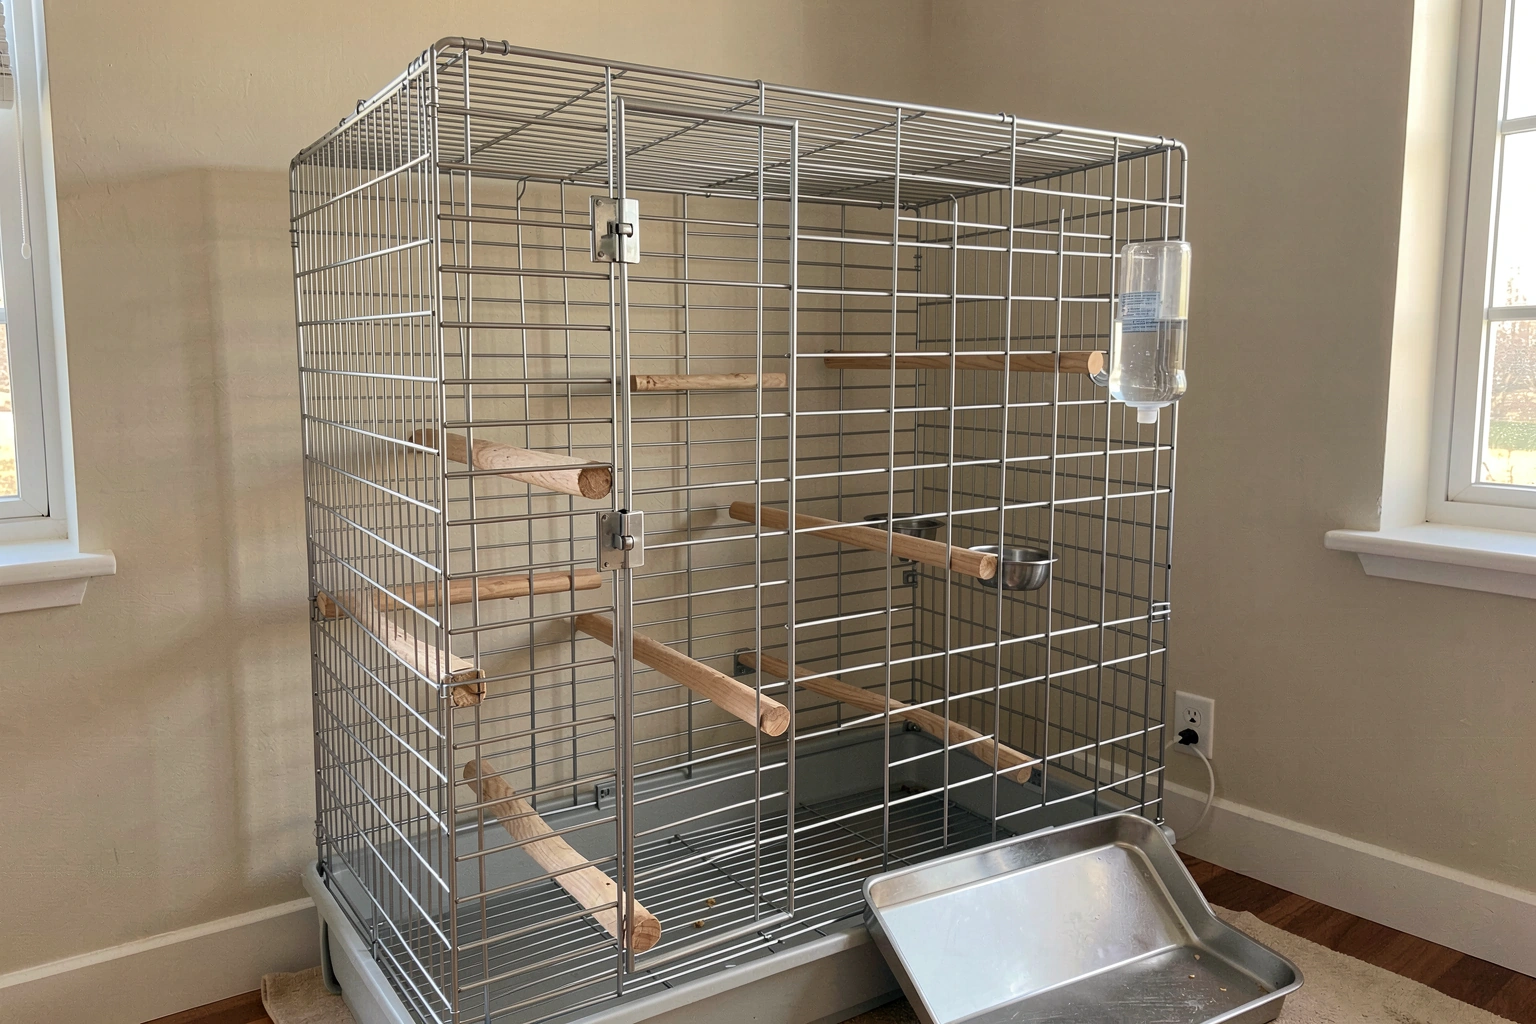
Essential Inside Features: Perches, Feeder and Water Setup, and Cleaning Access
Perches
Natural wood perches are far better than uniform dowels because varied diameter gives your bird's feet a workout and prevents pressure sores. Manzanita and java wood are popular, widely available, and safe. Cut them to span the cage width with about 0.5 to 1 inch of overhang on each side, then secure them through the wire with a stainless bolt and wing nut. Place perches at different heights but not directly over food or water bowls, because droppings in the food supply is a real problem. Leave enough clear space between perches for your bird to turn around without its tail dragging.
Feeder and Water Stations
Bolt-on stainless steel bowls that hook onto the wire are the easiest and most hygienic option. Mount them at a height your bird can reach comfortably from a perch, about mid-height on the cage wall. Use at least two food stations and one dedicated water station. For water, a water bottle attachment is more sanitary than an open bowl if your bird tolerates it. Whatever you use, the mounting hardware should not create a gap wider than your bird's bar spacing limit, because birds are creative about finding new escape routes.
Slide-Out Tray and Floor Grate
A slide-out tray is not optional. It's the feature that makes daily cleaning possible without disturbing your bird. Cut your tray from 18-gauge stainless sheet or a piece of ABS plastic, and size it to slide in and out smoothly with about 1/8-inch clearance on each side. Line it with unbleached paper, paper towels, or newspaper. Above the tray, install a floor grate with the same wire mesh you used for the walls, spaced 0.5 to 1 inch above the tray bottom. This keeps your bird from walking through its own droppings. The grate should be removable as well so you can clean it separately.
Setup and Maintenance: Placement, First Cleaning, and Daily Care
Where to Put the Cage
Cage placement affects your bird's health more than most people expect. Put the cage in a room where the family spends time. Birds are social and a cage stuck in a back room is a welfare problem. At the same time, avoid kitchens, where nonstick cookware fumes are a genuine hazard. Keep the cage away from direct airflow from air vents or fans. Constant directed airflow is hard on a bird's respiratory system even when the air temperature is comfortable. Against a wall on one or two sides gives the bird a sense of security. If the cage gets direct sunlight, make sure part of the cage is always in shade so your bird can regulate its own temperature. A spot near a window that gets morning sun with afternoon shade is ideal.
First Cleaning Before Use
Even a brand-new cage needs a full wipe-down before your bird moves in. Use a diluted white vinegar solution (1 part vinegar to 3 parts water) to clean every wire surface, the tray, and the frame. This removes any residual metal dust, oils from your hands during assembly, and anything picked up during shipping or storage. Rinse with plain water and let the cage dry completely. Do not use bleach for the first clean on a bare-metal cage because it can accelerate surface oxidation. Bleach is fine for ongoing cleaning of coated or stainless cages when diluted properly (1:32 ratio) and rinsed completely.
Daily and Weekly Care Routines
Daily cleaning takes about five minutes once you have a good system. Pull the tray, swap the liner paper, wipe down any soiled bars near food stations, and refill water. Weekly, remove and scrub the tray, floor grate, and food bowls. Once a month, do a full interior wipe-down with your diluted vinegar solution and inspect all clips, latches, perch bolts, and wire connections for wear. Any clip that has opened or been bent by the bird should be replaced immediately. Rotate natural wood perches out when they become heavily grooved or soiled, and introduce a new branch from a bird-safe wood species.
Build vs. Buy: A Quick Decision Guide
Building your own cage is genuinely worth it in certain situations and not worth it in others. Here's how to think about it quickly.
| Situation | Build DIY | Buy Commercial |
|---|---|---|
| You have a large or unusual-sized bird that commercial cages don't fit well | Yes | — |
| You need a very large aviary or walk-in enclosure | Yes | — |
| You want stainless steel at a lower cost than commercial stainless cages | Yes | — |
| You need a cage this week with no tools or build time | — | Yes |
| You have a small bird (budgie, finch) and a tight budget | — | Yes, commercial is often cheaper |
| You want to convert an armoire or cabinet into a cage | Yes | — |
| You're unsure about bar spacing or material safety | Build only if you can verify specs | Buy from a reputable bird-supply brand |
Start by measuring your bird's wingspan, confirm your target bar spacing from the table above, source your wire and frame material, and do your full process before the first use. The build itself is satisfying, and a well-made DIY cage will outlast most commercial options.
FAQ
How can I verify bar spacing is truly safe after the cage is assembled?
Do a quick “head test” and “pull-out test” on every cage panel. Place a small, round rod of the same diameter as the bird’s head would require, then check that once the rod can enter, it cannot be pulled back out through the same gap without force. If you feel any roughness that could catch skin or feathers, remove it before the bird is introduced.
What changes should I make if I have cats or dogs around the DIY bird cage?
If you live with other pets, secure the cage door first, then add a secondary barrier step for access (for example, keep the cage door latch oriented out of reach and avoid leaving the door ajar). Also check that any wiring, toys, or rope they can reach cannot be pulled into the cage gaps, since this can both injure the bird and create an escape route.
How do I know my powder coat or finish is fully cured and safe?
Do not assume a powder coat is automatically bird-safe because it is labeled “food-safe” or “durable.” Before using it, confirm the coating is fully cured and specifically intended for animal-contact environments, and inspect for any tackiness or bubbles after curing. A simple rule, if your fingernail leaves a mark when pressed firmly, it is not ready.
What are common mistakes with the slide-out tray that can create escape or injury risks?
For a slide-out tray, aim for smooth travel without binding when the tray is fully loaded. Test by pushing the tray in and out with no bird inside, then again with weight that approximates normal droppings and water spill. If there is any wobble or a large gap at the sides, adjust the tray clearance so a toe cannot slip into the space.
What should I watch for over time if my bird is a heavy chewer?
If your bird chews aggressively, inspect for progressive wire distortion rather than waiting for visible damage. Replace any panel where you see bending at the attachment points, because the first chewed area often spreads gaps. When selecting wire, prioritize material and coating integrity, not just bar spacing.
Can I build or finish a DIY bird cage in a home where I cook with nonstick pans?
Yes, but only if you keep the ventilation plan consistent. Avoid placing the cage where cooking fumes can accumulate, and do not run power tools right near uncovered cookware. If you must do finishing work during a kitchen renovation, schedule it so the cage room is empty during curing and until odors are gone, then do a vinegar wipe-down before use.
What cleaning products or tools are safest to avoid scratching or damaging the cage?
For cleaning, avoid abrasive pads or harsh solvents that can scratch coatings and expose underlying metal. For ongoing maintenance, stick to your vinegar solution and thorough rinsing for any area that the bird can contact, then fully dry to prevent residue buildup that can encourage chewing or foot irritation.
How should I choose perch material and placement for different bird sizes and feet?
Add perches that match how your bird naturally uses the cage, and do not place perches directly over food or the water system. Confirm perch diameter gives toes good contact, and rotate natural wood out when grooves form, since worn perches can cause pressure sores even if they are still “safe species” wood.
Do I need a second latch for DIY cages, and how do I test latch security properly?
If your bird can reach the latch area from any perch position, treat the door like it is under constant attack. Consider adding a second lock or a redundant latch that requires two independent actions, and re-test with your hand every time you adjust hardware or after any repair.
How do I prevent overheating if my DIY cage is near a window?
If the cage is near a window, keep part of the enclosure in shade at all times and confirm there are no direct sun hotspots on metal surfaces during the hottest hours. A reliable approach is to observe for one full sunny afternoon and adjust placement if the cage wall or floor grate becomes noticeably warm to the touch.
Next Article
How to Make a Large Bird Cage at Home: DIY Steps
Step-by-step DIY guide to build a safe large bird cage: sizing, materials, wire spacing, doors, assembly, and safety che